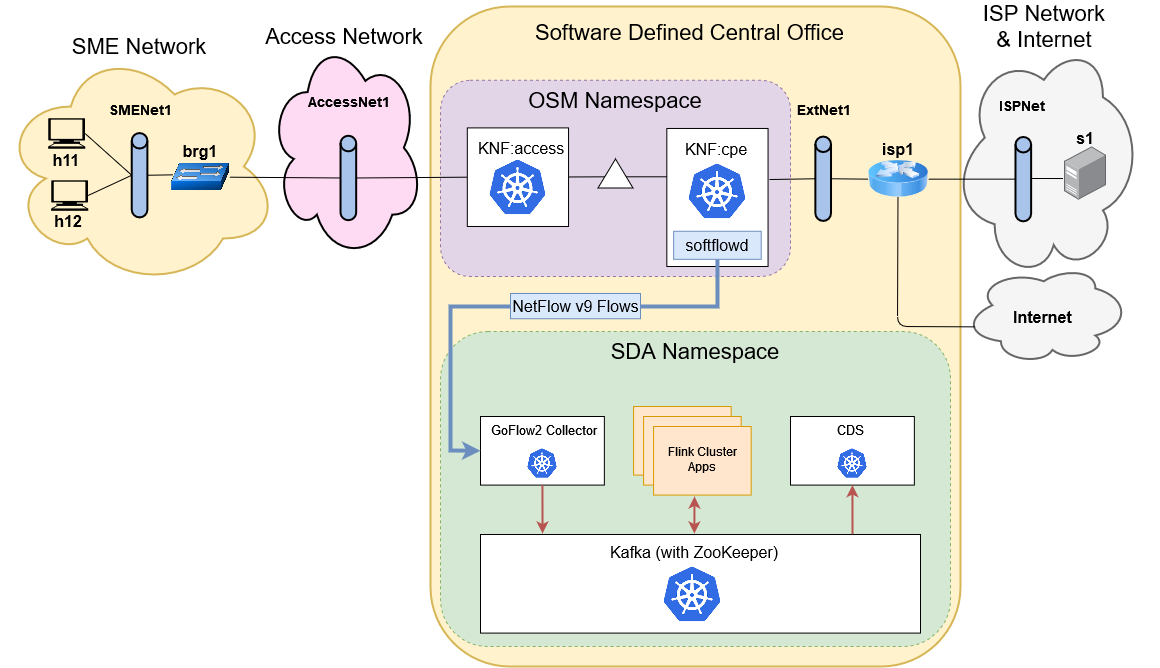
nfv-lab-cds
Helm repository based on a NFV laboratory practice with SDA+CDS integration, for demostrative purposes.


Quick deployment and testing guide
- Download RDSV-K8S and RDSV-OSM virtual machines.
You can download them from the following link: http://idefix.dit.upm.es/download/vnx/vm/.
- Launch RDSV-K8S and RDSV-OSM virtual machines.
NOTE: Bear in mind that these virtual machines need more resources than the ones originally defined. A basic recommendation would be to set these machines to use, at least, 8 CPU cores and 12 GB of RAM. For the RDSV-K8S machine, install any required software, like Helm or the standalone kubectl util (and point it to the MicroK8s cluster). Also, your Docker daemon must be configured to use a private repository, and this repository must contain all the custom images of the services that will be deployed. The following links give instructions to accomplish this:
- Running Flink clusters in application mode on Kubernetes.
- Dockerfiles of services.
- Working with a private Docker registry.
- Configuring the standalone kubectl tool to point to a MicroK8s cluster (you need this to use Helm).
You also need to build the image of the vAccess and vCPE KNFs/VNFs. You can find it here. Before building it, you must download the sample PCAP with cryptomining traffic by executing the script download_pcap.sh. After building it, push it to the private Docker repository you enabled before.
- On both machines open a terminal, clone the repository and change to its directory.
$ cd Desktop/
$ git clone https://github.com/giros-dit/nfv-lab-cds.git
$ cd nfv-lab-cds/
- On RDSV-K8S, start the VNX scenarios.
$ cd vnx/
$ ./vnx_create_all.sh
- On RDSV-K8S, launch all SDA+CDS-related services.
$ cd ../kubernetes/ $ cd test-services/ $ kubectl apply -f zookeeper.yaml $ kubectl apply -f kafka.yaml $ cd ../netflow-sda-cds-full-pipeline/ $ helm install -f values.yaml netflow-sda-cds-full-pipeline . - On RDSV-OSM, add this Helm chart repository to OSM. To do so, open Mozilla Firefox on this machine, open http://localhost and login to the OSM GUI with the following credentials: admin/admin (they are already configured and saved by default). Once logged in, navigate to the menu on the left-side of the interface and go to K8s -> K8s Repos. Then, click on the button Add K8s repository and fill in the form with the following information:
Name: helmchartrepo Type: Helm Chart URL: https://giros-dit.github.io/nfv-lab-cds Description: Type a short, descriptive phrase. -
On RDSV-OSM, onboard the VNF and NS descriptors using the same GUI: navigate to Packages -> VNF Packages and Packages -> NS Packages.
- Once the onboarding has completed, open a terminal in RDSV-OSM and instantiate a network service with the following command:
$ osm ns-create --ns_name renes1 --nsd_name renes --vim_account dummy_vimYou can check the instantiation status with
watch osm ns-list. If an error appears during the instantiation (likely), delete it from the GUI (menu Instances -> NS Instances) and repeat the instantiation command. This time it should complete successfully. - After the instantiation, configure the NS. On RDSV-OSM, open a terminal and execute the following commands.
$ cd Desktop/ $ cd nfv-lab-cds/scripts/ $ export OSMNS=7b2950d8-f92b-4041-9a55-8d1837ad7b0a $ ./osm_renes1.sh - Go to RDSV-K8S and, with kubectl, execute the bash command on the kafka pod to open a console. Then, use the
kafka-console-consumer.shscript to print all the messages written to thesda-netflow-cdstopic. You can open the XFCE console of h11 and generate some network traffic. After several seconds, you should be able to see some messages. You can inject the sample PCAP file with cryptomining traffic. To inject this PCAP, on RDSV-OSM execute the following command:$ ./softflowd_inject_pcap.shIf you open the Kafka console you should be able to see more messages.